Change the location of the Project folder
In BIMcollab Zoom, you can use the Project folder to connect to BIMcollab Nexus and share IFC files.
As BIM projects are always in motion, and its setup might change over the course of the project, it may become necessary to change the location of the project folder on your computer. Should that be the case, there is a risk that other attributes stored in that project folder, such as model prefixes, will be lost which could affect all users in the project. To prevent that from happening, make sure that the folder name and subfolders remain the same, and only the path is changed. Below you find some recommendations on how to make these changes without losing information saved in the project.

The project folder location path is machine specific, meaning that different users can navigate to the same shared folder through a different path on their computers. Changes in the path won’t therefore affect any other users. On the other hand, changes in the 'checked' folders that are shared, are common for every user connected to the project. This means that unchecking or renaming a folder, means removing all information about it saved in the project (including prefixes).
As a project leader
As an example, let's assume the IFC models from a specific project have to be moved from the shared location 'C:\Users\Public\Documents\BIMcollab Zoom\Sample\' to the new shared location 'C:\OneDrive\BIM Projects\Example project\Sample\'.
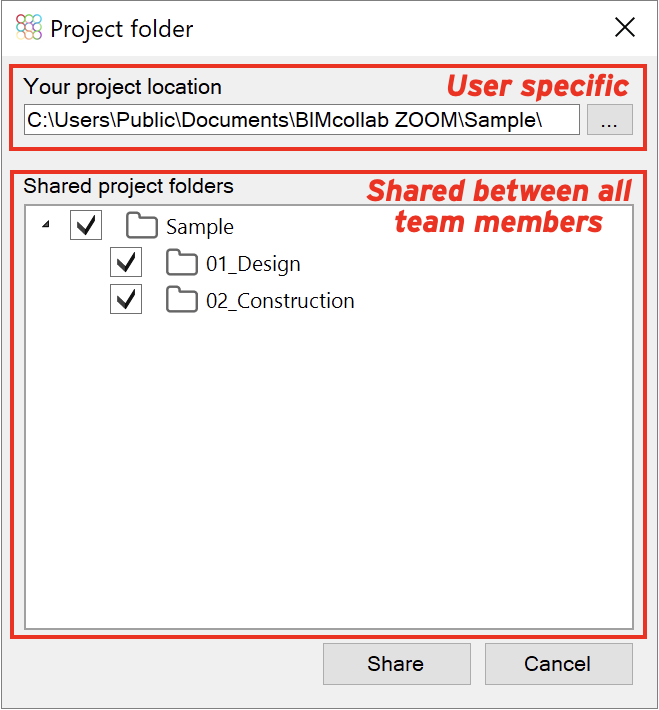
- In BIMcollab Zoom, go to File > Project folder.
- Under 'Shared project folders', check what the top selected folder is, by cascading open all folders. In this example, the folder 'Sample' is the highest level.
- Go to the File Explorer (Windows) or Finder (Mac) and move the top folder from the previous step ('Sample') from the old to the new location, by dragging it or using cut and paste.Make sure the folder name and structure of the subfolders does not change.
- Go back to File > Project folder... in BIMcollab Zoom. You will see that now, after moving the files, the top folder is no longer checked. This is because Zoom cannot find the files anymore. This will be adjusted in the next steps.
- Click on the three dots to change the file path location (...) and navigate to the new location to which the models were moved. Make sure to select the folder that had the highest hierarchy before, and click 'Select'. Notice that the files are no longer shown in red in BIMcollab Zoom.
 Do not uncheck any folders in 'Shared project folders'.
 - Click 'Share'. The operation of moving the files is complete, and the information of the project folder, such as prefixes, is retained. (To 'Share' a Zoom license is needed.)
- Synchronize the project, so the new project folder location is shared with the rest of the team.

To summarize, in order to prevent losses it is important that:
- The folder structure and folder names are exactly the same before and after moving the files
- There are no changes made to the checked folders in 'Shared project folders'
Any changes may result in loss of project information.
As a project team member
Once the project leader has changed the location of the project folder, team members will also have to navigate to the correct folder one time, when they connect to the project again for the first time after the change.
- In BIMcollab Zoom, go to File > Project folder.
- You will see that the folders under 'Shared project folders' will no longer be checked.
- Click on the three dots to change the file path location (...) and navigate to the new location to which the models were moved. Make sure to select the folder that had the highest hierarchy before, and click 'Select'. Notice that the files are no longer shown in red in BIMcollab Zoom.If you have Zoom editing rights, but are not the project leader that made changes to the project folder location, do not uncheck any folders in 'Shared project folders'.
- Click OK to close the window.
- The models will be displayed in the Navigation tab, and project information such as prefixes remain the same as before.
- Synchronize the project to save your personal folder path to the project.
Related Articles
Set up the Project folder to link shared files to a project
The project folder functionality in BIMcollab Zoom, makes it possible to link a shared folder to a project on BIMcollab Nexus. When this functionality is set up for a project, the IFC- and/or Point cloud files in the shared folder will be ...Load the files from a shared project folder in BIMcollab Zoom
In BIMcollab Zoom, it is possible to link IFC files and point clouds stored in a shared folder, to the project. This workflow ensures that all team members of the BIMcollab Nexus project always have access to the most recent files in Zoom. This ...The Project folder in combination with a Cloud storage platform
It is possible to make use of a folder on a Cloud storage platform, like Autodesk Docs or Trimble Connect, as project folder in BIMcollab Zoom. There are some things to take into account when making use of this workflow. Folders that are used as a ...Why do the model names in my project have different colors?
The files displayed in the model tree of BIMcollab Zoom can have the following colors: Black = loaded model Grey = model file found, but not loaded. Right click the model, and choose Load model if you want to show the model in BIMcollab Zoom Red = ...Explore the example project in BIMcollab Zoom
The BIMcollab example project consists of nine IFC models. Each model belongs to a different discipline and has been exported from a variety of BIM applications demonstrating the versatility of an openBIM workflow. The BIMcollab example project can ...